Cutting in Butter: Choosing the Right Tool for Flaky Results
There's a secret to those incredibly flaky pie crusts, tender biscuits, and delicate scones that melt in your mouth. It's not just about the recipe; it's about a fundamental baking technique known as "cutting in butter." This seemingly simple step is the cornerstone of many beloved baked goods, creating the ethereal layers and pockets of air that define their texture. If you've ever wondered how to cut in butter easy tips and techniques, you're in the right place. We'll demystify this essential process, explore the best tools for the job, and share expert insights to help you achieve baking perfection.
What "Cutting In Butter" Truly Means for Your Baking
At its core, cutting in butter involves incorporating cold, solid pieces of butter into dry ingredients, typically flour, in such a way that the butter remains in small, distinct clumps. It's a technique designed to avoid fully blending the fat with the flour, which would result in a dense, chewy texture rather than the light, airy flakiness we crave.
The magic happens in the oven. When these tiny, cold pockets of butter encounter the heat, they melt, releasing steam. This steam then pushes apart the layers of dough around them, creating those coveted air pockets and separation within the structure of your pastry. Without these distinct butter pieces, you lose the opportunity for steam to create lift, resulting in a tougher, less desirable texture.
The absolute key here is cold butter. Warm butter will soften and emulsify too easily with the flour, eliminating the very "lumps" needed for flakiness. Keeping your butter, and even your dry ingredients and tools, as cold as possible is paramount to success. For a deeper dive into the science behind this crucial step, don't miss our article: Why Cold Butter is Key for Flaky Crusts: Avoid These Mistakes.
Choosing Your Weapon: Essential Tools for Cutting in Butter
While the concept of cutting in butter is straightforward, selecting the right tool can significantly impact your efficiency and the final outcome. Some tools are designed for speed and consistency, while others offer a readily available solution. Let's explore the top contenders:
1. The Pastry Cutter (or Pastry Blender)
Recommended Most Highly: Often seen as the gold standard for this task, a pastry cutter is specifically designed for cutting in butter. It typically features several sturdy wires or blades attached to a handle, resembling a half-moon shape or a series of parallel lines.
- Pros:
- Efficiency: Its design allows you to quickly and evenly cut butter into small pieces without overworking the dough.
- Keeps Butter Cold: Minimizes contact with the warmth of your hands, a critical factor for flaky results.
- Consistency: Helps achieve a uniform "coarse crumb" texture, essential for even baking.
- Expert Tip: When using a pastry cutter, press down and twist, moving it around the bowl until the butter is incorporated into pea-sized to small pebble-sized pieces. Look for models with comfortable grips and sturdy stainless steel blades for durability. This tool truly offers an how to cut in butter easy tip for beginners and experienced bakers alike.
2. Two Knives
A simple, accessible method for those without a specialized pastry cutter, using two knives is a time-honored technique.
- Pros:
- Readily Available: Almost every kitchen has two butter knives or small paring knives.
- Effective: With patience, you can achieve the desired crumbly consistency.
- Cons:
- Time-Consuming: It generally takes longer than using a pastry cutter.
- More Effort: Requires consistent cross-cutting motions.
- Expert Tip: Hold two knives parallel to each other and perpendicular to the butter cubes. Use a cross-cutting motion, slicing through the butter and dry ingredients. Continue until the butter pieces are evenly coated in flour and reduced to the desired size.
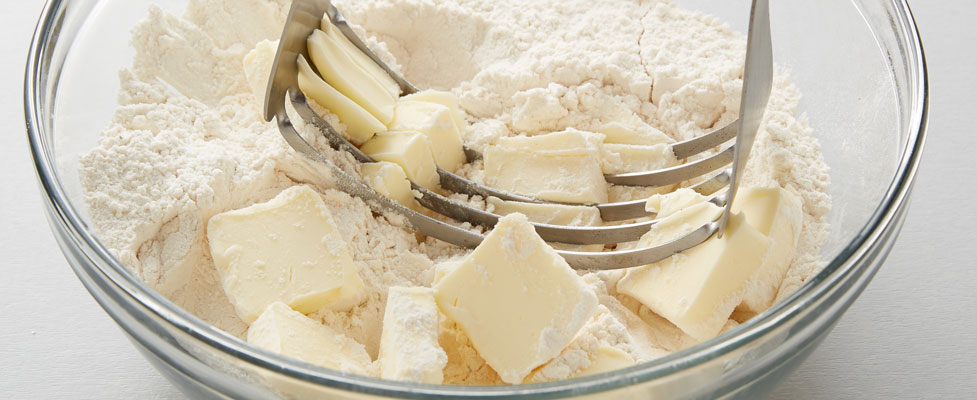
3. A Fork (or Two Forks)
Another common kitchen utensil, a fork can be surprisingly effective for cutting in butter, especially for smaller batches or if your butter is already cut into smaller pieces.
- Pros:
- Common Tool: Everyone has forks.
- Gentle: Allows for a more delicate touch, reducing the risk of overmixing compared to some other methods.
- Cons:
- Slower: Can take longer than a pastry cutter.
- Less Efficient: Might require more mashing and less cutting, especially if butter pieces are large.
- Expert Tip: Place your cold, pre-cut butter pieces (ideally 1/2-inch cubes) into your flour mixture. Use the tines of the fork to smash and break up the butter against the bottom or sides of the bowl, incorporating it into the flour. For extra speed, use two forks and a cross-cutting motion similar to the knives.
4. A Food Processor
For speed and minimal physical effort, a food processor can be a powerful ally, but it comes with a significant caveat.
- Pros:
- Fastest Method: Cuts butter into flour in mere seconds.
- Hands-Free: Keeps hands completely away from the cold butter.
- Cons:
- Risk of Overmixing: This is the biggest danger. Over-processing can quickly turn distinct butter pieces into a paste, or even warm the butter, compromising flakiness.
- Potential for Gluten Development: The high-speed blades can overdevelop gluten if you're not careful.
- Expert Tip: Ensure your butter is well-chilled and cut into 1-inch cubes. Add the flour and butter to the food processor. Use short, quick pulses (1-2 seconds each) rather than continuous processing. Check the mixture frequently, stopping as soon as you achieve a coarse crumb texture—like peas or coarse sand. Over-reliance on this tool without careful monitoring can quickly lead to tough pastry.
Tools to Avoid (And Why)
While the methods above offer varying degrees of success, some tools are simply not suited for cutting in butter:
- Your Hands: The warmth from your hands is the enemy of cold butter. As soon as your fingers make contact, the butter begins to melt and soften, blending into the flour rather than remaining in distinct pieces. This inevitably leads to a less flaky, often tougher, baked good.
- A Stand Mixer or Hand Mixer: These appliances are designed to cream, whip, or thoroughly combine ingredients. Their rotating beaters or whisks will over-incorporate the butter, smearing it into the flour and preventing the formation of those crucial little pockets. You'll end up with a smooth, doughy mixture instead of the desired coarse crumbs.
Achieving Flaky Perfection: Step-by-Step Tips for Cutting in Butter
Beyond choosing the right tool, mastering the technique itself is key. Here are some actionable tips for consistent success:
- Start with Extremely Cold Butter: This cannot be stressed enough. Cut your butter into 1/2-inch to 1-inch cubes and place them back in the fridge or even freezer for 10-15 minutes before you begin. Some bakers even chill their flour, bowl, and chosen tool!
- Work Quickly: Regardless of the tool you use, minimize the time the butter is exposed to room temperature or handling. The faster you incorporate it, the colder it will remain.
- Aim for the Right Texture: You're looking for a mixture that resembles coarse crumbs, with some pieces of butter still visible, ranging from the size of small peas to tiny pebbles. There should be no large chunks of butter, but also no smooth, uniform paste.
- Don't Overmix: This is crucial. Once you hit the desired texture, stop! Overmixing, especially with a food processor, can warm the butter and overdevelop gluten, leading to a tough pastry.
- Consider Your Environment: If you're baking in a warm kitchen, your butter will soften faster. Work by an open window, in an air-conditioned room, or pre-chill your ingredients even more thoroughly.
For a more visual and detailed step-by-step guide to this technique, refer to our comprehensive article: Easy Guide: How to Cut In Butter for Perfect Flaky Pastries.
Conclusion
Mastering the art of cutting in butter is a fundamental skill that elevates your baking from good to extraordinary. By understanding the importance of cold butter and selecting the right tool for the job—whether it's a dedicated pastry cutter, the versatility of knives or forks, or the speed of a food processor (used with caution)—you unlock the secret to creating truly flaky, tender, and irresistible baked goods. Experiment with these methods, pay close attention to the texture, and remember that patience and keeping things cold are your best friends. Soon, you'll be confidently turning out pastries that are the envy of every baker!
