Why Cold Butter is the Undisputed Secret to Flaky Crusts
Every baker dreams of a pie crust so flaky it practically shatters, biscuits that separate into tender layers, and scones with that perfect crumb. While many factors contribute to these bakery-quality results, there’s one non-negotiable hero at the heart of it all:
cold butter. Mastering the art of "cutting in butter" isn't just a technique; it's a fundamental principle that unlocks the potential for truly spectacular baked goods. Forget complicated methods; understanding the "why" behind cold butter is your first and most important step towards achieving those coveted layers.
What "Cutting In Butter" Truly Means for Bakers
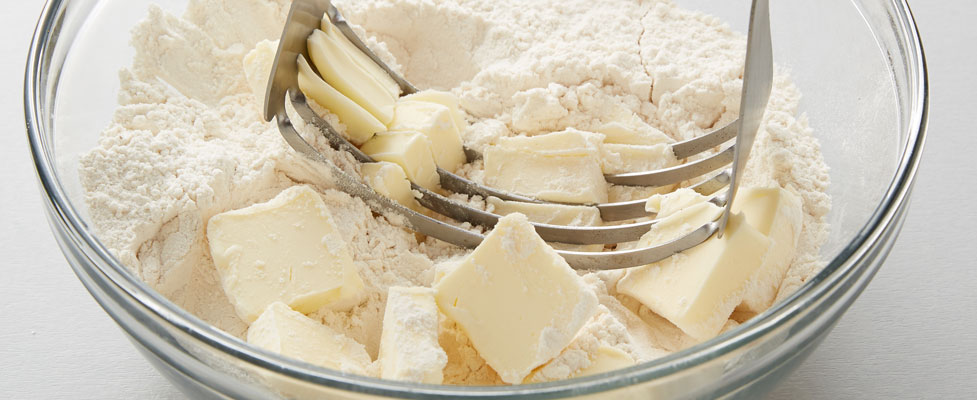
At its core, "cutting in butter" is a culinary term that might sound intimidating but is surprisingly straightforward. It refers to the process of incorporating solid, cold butter into dry ingredients, typically flour, in such a way that the butter remains in small, distinct pieces. Instead of melting into the flour and disappearing, the butter is merely *distributed* throughout, coated in flour but still maintaining its structural integrity as tiny clumps. This technique is a cornerstone for recipes like pie crusts, biscuits, scones, and certain pastry doughs where a light, airy, and layered texture is desired. The goal is to create a mixture that resembles coarse crumbs or small peas, where the butter is visible but well integrated with the flour. This simple concept, when executed correctly, is the magic behind every perfect pastry.
The Science of Cold Butter: Why Flaky Crusts Demand It
So, why the unwavering insistence on *cold* butter? This isn't just a baking whim; it's rooted deeply in food science, and understanding it is an invaluable "how to cut in butter easy tip."
When you use cold butter and manage to keep it in those tiny, solid pieces within your dough, something wonderful happens in the oven. As the dough bakes, the cold butter melts slowly and eventually turns into steam. This steam then gets trapped by the layers of gluten and flour, expanding rapidly and forcing the dough apart, creating thousands of microscopic pockets of air. These air pockets are precisely what give your pie crusts, biscuits, and scones their signature lift, airy texture, and incredible flakiness. The faster the butter melts and turns to steam, the more pronounced these layers become.
Conversely, if your butter is warm or allowed to soften too much before baking, it will blend seamlessly with the flour. When warm butter is incorporated, it coats the flour too thoroughly, inhibiting the formation of separate butter pockets. Without these distinct pockets, there's no localized steam production to create those crucial gaps. The result? A dense, tough, and often greasy baked good that lacks the desired light and flaky texture. Furthermore, warm butter can accelerate gluten development in the flour, leading to a tougher product. That's why many experienced bakers even go so far as to chill their flour, mixing bowls, and tools – every bit of chill helps slow down gluten formation and keeps the butter solid until it hits the oven.
Mastering the Technique: Your Guide to Cutting In Butter
Achieving that perfect coarse crumb texture with cold butter is a fundamental skill that significantly impacts the quality of your baked goods. The key is working quickly and efficiently to keep the butter as cold as possible throughout the process.
1.
Start with Super Cold Butter: This cannot be stressed enough. Cut your butter into small, uniform cubes (about ½-inch to 1-inch) and place them back in the refrigerator or even the freezer for 10-15 minutes before you begin. This ensures the butter is rock hard.
2.
Combine Dry Ingredients: In a large bowl, whisk together your flour, salt, sugar, and any other dry ingredients.
3.
Add the Cold Butter: Scatter the cold butter cubes over the dry ingredients.
4.
Begin the Cutting Process: Whether you're using a pastry blender, two knives, or a food processor (more on tools below), the goal is to break down the butter into smaller and smaller pieces, coating each piece with flour as you go. Work quickly to minimize contact with your warm hands or room temperature environment.
5.
Achieve the Right Consistency: Continue working until the butter pieces are about the size of small peas or coarse crumbs. There should still be some larger, lentil-sized pieces, as these contribute significantly to flakiness. The mixture should look sandy and slightly clumpy, but not uniform or smooth. You should still be able to discern distinct butter pieces.
Remember, speed is your ally here. The less time the butter spends outside the cold environment, the better. For a more detailed, step-by-step visual guide on this essential technique, check out our
Easy Guide: How to Cut In Butter for Perfect Flaky Pastries.
Tools of the Trade: Finding Your Perfect Butter-Cutting Ally
While the principle of cold butter remains constant, there are several methods and tools you can employ to achieve the desired consistency. Each has its advantages, offering a suitable "how to cut in butter easy tip" for different bakers and kitchen setups.
*
The Pastry Cutter (or Pastry Blender): This specialized baking tool is perhaps the most recommended for a reason. Its curved metal blades are designed to efficiently cut through cold butter and blend it into flour without overworking the mixture or transferring too much heat. It makes quick work of creating those coarse crumbs, making it an excellent choice for consistent results.
*
Two Knives: A classic and highly accessible method. Hold two butter knives with the blades facing each other, crossing them to "scissor" through the butter and flour mixture. It requires a bit more effort and time than a pastry blender but is very effective. The key is to keep cutting and scraping until the desired crumbly texture is achieved.
*
A Fork: Another readily available kitchen utensil, a fork can be used to "mash" and break up butter pieces into the flour. This works particularly well if your butter is already cut into smaller pieces. Simply press down and smash the butter, then lift and toss it with flour, repeating until it's incorporated. It might be a bit slower for larger quantities but works well for smaller batches.
*
A Food Processor: For speed and convenience, a food processor is unmatched. Add your dry ingredients and cold, cubed butter to the bowl, then pulse in short bursts until the mixture resembles coarse crumbs. The critical caution here is *do not overmix*. Over-processing can quickly turn the butter into a paste, melt it, or overdevelop the gluten, defeating the purpose of cold butter and leading to a tough pastry. It’s an easy tip for how to cut in butter if you’re short on time, but demands vigilance.
To dive deeper into the pros and cons of each method and find your ideal tool, read our comprehensive article on
Cutting in Butter: Choosing the Right Tool for Flaky Results.
Common Mistakes to Avoid for Bakery-Quality Results
Even with the best intentions, a few common pitfalls can derail your efforts for that perfect flaky crust. Avoiding these mistakes is another crucial "how to cut in butter easy tip."
*
Using Warm Butter: As discussed, this is the cardinal sin. Butter that is too soft will meld with the flour, preventing the formation of those essential pockets of steam. Always use butter straight from the fridge, or even briefly chilled in the freezer.
*
Overworking the Dough: Whether with your hands or a food processor, overmixing is a common culprit. Too much handling melts the butter and overdevelops the gluten, resulting in a tough, dense, and un-flaky product. Work quickly and stop as soon as the desired consistency is reached.
*
Using Your Hands (Unless You're Very Quick): While an option, the heat from your hands can quickly warm up the butter, turning your beautiful cold chunks into a greasy mess. If you must use your hands, work extremely fast, using only your fingertips, and chill them beforehand if possible.
*
Employing the Wrong Tools: A stand mixer or hand mixer might seem like a shortcut, but they are not designed for cutting in butter. They tend to incorporate the butter too thoroughly, making it impossible to maintain those crucial small pieces. Stick to the recommended tools for optimal results.
*
Not Chilling Your Ingredients and Tools: While the butter is paramount, taking the extra step to chill your flour, mixing bowl, and even your pastry blender can significantly contribute to keeping the butter cold throughout the process, giving you an edge in achieving truly flaky results.
In essence, the path to perfectly flaky pie crusts, biscuits, and scones is paved with cold butter and mindful technique. By understanding *why* cold butter is crucial and implementing the proper methods and tools, you’ll unlock a world of delicious, layered baked goods. Embrace the chill, avoid the common missteps, and get ready to enjoy the fruits of your labor – light, airy, and exquisitely flaky creations that will impress every time.